
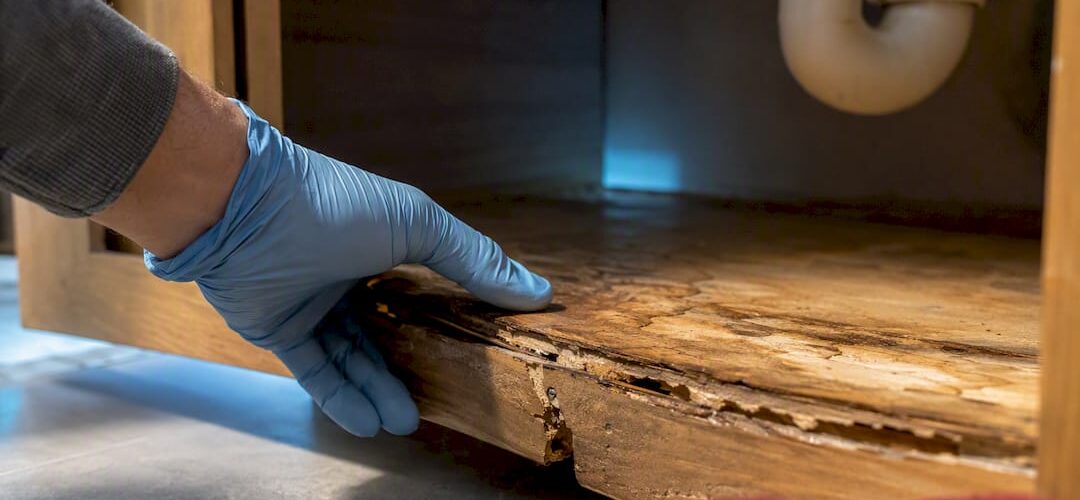
Most water damaged sink cabinets are salvageable if you catch them before the wood swells or mold takes hold. Shut off the water first, then check the cabinet floor: if it’s still firm, dry it out and patch the finish yourself. If it’s soft, swollen, or smells musty, you’re looking at a floor replacement, and possibly a call to a mold specialist before you touch anything else.
TL;DR:
- Soft, swollen, or mold-smelling wood indicates structural damage requiring cabinet replacement and mold remediation before further repairs.
- Drying the cabinet for at least 24 to 72 hours with fans is crucial; skipping this step risks mold growth and ineffective repairs.
- Use 3/4 inch exterior grade plywood for replacements, as swollen MDF or particleboard cannot regain original strength and will fail again.
- Seal all pipe penetrations with silicone and add leak detectors to prevent repeat water damage and catch slow leaks early.
- Professional refinishing is recommended for cosmetic repairs after structural work, as hand-matching finishes is challenging and usually imperfect.
Table of Contents
- How Do You Assess Water Damage In A Sink Cabinet?
- Stop The Leak And Dry The Cabinet Safely
- Which Repair Option Fits Your Damage Level?
- How Do You Replace A Water Damaged Cabinet Floor?
- When Is Mold A DIY Job, And When Isn’t It?
- What Prevents Water Damage From Coming Back?
- When Should You Call A Plumber Or Cabinet Pro?
- Why Professional Refinishing Matters For The Repair Decision
- How Do You Dispose Of Water Damaged Cabinet Material Safely?
- How Do You Catch A Repeat Leak Before It Damages The Cabinet Again?
- What The Repair Data Actually Tells You
- Need A Second Opinion On Your Cabinet Repair?
- Sources
- FAQ
How Do You Assess Water Damage In A Sink Cabinet?
Start with your eyes, then your hands. Look for discoloration or dark staining on the cabinet floor, bubbling or peeling veneer, separated joints at the corners, and rusted hinges or screws, all signs water has been sitting longer than a quick drip.
Then press. Push firmly on the cabinet floor, the side panels, the toe-kick, and the flooring just outside the cabinet. Soft or spongy spots mean the wood has already absorbed water past the point of easy repair. Take a sniff while you’re down there. A musty, sour smell usually means mold has started, even if you can’t see it yet.
Damage generally falls into three tiers:
- Surface moisture: discoloration or a slightly soft finish, but the panel itself is still rigid and holds a screw.
- Moderate swelling: the particleboard or MDF has puffed up, edges have lifted, but the damage is contained to one panel.
- Structural or subfloor involvement: rot has spread to the cabinet frame, adjoining cabinets, or the surrounding floor.
If you’re only dealing with tier one, a DIY overlay or cosmetic touch-up will likely hold. Tier three means you need a contractor’s eyes on it before you go any further, especially if the subfloor feels soft when you step on it near the sink.
Stop The Leak And Dry The Cabinet Safely
Fixing the cabinet without fixing the plumbing first is wasted effort. Trace the leak before you touch a tool.
- Shut off the water at the supply valves under the sink, or at the main if you can’t find them.
- Check the usual suspects: supply line connections, the P-trap, the garbage disposal collar, and the faucet base gasket.
- Remove everything from the cabinet and pull the doors if they’re in the way.
- Run a fan (or two) pointed into the open cabinet for 24 to 72 hours before you assess further. Trapped moisture can start growing mold in as little as 24 to 48 hours, so don’t skip this step.
- Once it’s dry, lay a paper towel flat on the cabinet floor overnight. If it’s still bone dry in the morning, the leak is truly stopped.
Pro Tip: Never point a heat gun or space heater directly at particleboard or MDF to speed up drying. Concentrated heat can scorch the material or make swelling worse instead of better.
If the leak is coming from inside a wall, under a slab, or you can’t isolate the source after checking the obvious points, call a plumber before you dry anything. No amount of fan time fixes a leak that’s still active.
Which Repair Option Fits Your Damage Level?
The repair path should match the tier you identified, not your instinct to fix everything with paint.
- Surface-only damage: light sanding, wood filler on small dings, then primer and paint. This works when the panel is still structurally firm, just cosmetically rough.
- Moderate damage: cut out the compromised section and install a plywood overlay, or fill small voids with epoxy filler and wood hardener. This is the sweet spot for most DIY sink cabinet repairs.
- Severe damage: replace the entire cabinet bottom panel, or the full cabinet box if the frame itself has failed. If the subfloor beneath the cabinet is soft, that gets addressed before the new panel goes in.
One material rule matters more than any other: swollen particleboard or MDF never regains its original strength. Once it’s puffed up, it’s done. Don’t sand it flat and repaint over it hoping it holds. For the new floor, use 3/4 inch exterior grade plywood, it holds screws better, resists future moisture longer, and won’t repeat the failure that got you here. This is also why so many IKEA-style particleboard cabinets fail the same way twice: homeowners patch the original material instead of swapping it out.
How Do You Replace A Water Damaged Cabinet Floor?
This is the repair that handles most moderate-damage cases without hiring anyone.
Tools and materials: 3/4 inch plywood, a jigsaw or hole saw, construction adhesive, 1.25 inch wood screws, 100% silicone caulk, primer, and paint or a vinyl liner.
- Remove the damaged floor panel completely, including any fasteners holding it to the frame.
- Measure the opening from inside the cabinet, not the old panel, since swelling can throw off the original dimensions.
- Mark and cut holes for the P-trap and any supply lines using a hole saw or jigsaw, test fitting before you commit to the cut.
- For face-frame cabinets where a single sheet won’t slide in past the frame, cut the panel into two pieces and add a support block underneath the center seam.
- Prime and seal all six sides of the plywood before installation. Sealing the edges is what actually keeps the next leak from soaking back in.
- Set the panel with construction adhesive, then drive screws every 6 to 8 inches around the perimeter.
- Run a bead of silicone caulk around the panel’s perimeter and any pipe penetrations.
- Let it cure, then rerun the paper-towel test overnight before restocking the cabinet.
Pro Tip: Cut your pipe openings slightly oversized and caulk around them rather than forcing a tight fit. A snug hole that traps moisture against the pipe defeats the purpose of the new panel.
When Is Mold A DIY Job, And When Isn’t It?
Small, contained mold on a hard surface is usually manageable yourself. Anything bigger, or anything you can smell but can’t see, isn’t.
- Clean areas smaller than roughly 10 square feet with a detergent solution or a labeled fungicide, wearing gloves, eye protection, and an N95 mask.
- Never dry-sand a moldy panel. That launches spores into the air you’re breathing and everywhere else in the kitchen.
- Call a remediation specialist for mold inside wall cavities, mold that keeps returning after cleaning, or a musty smell with no visible source.
- Photograph everything before you clean or demo anything. Homeowners insurance often excludes long-term seepage damage but may cover a sudden, accidental discharge, and documentation is what separates a covered claim from a denied one.
Moisture trapped inside a closed cabinet is exactly the environment mold needs, dark, damp, and still. That’s the real reason the 24 to 72 hour drying window isn’t optional.
What Prevents Water Damage From Coming Back?
Prevention here is cheap compared to the repair you just made. A few small habits catch problems before they become another overlay project.
- Seal every pipe penetration in the cabinet floor with 100% silicone, or add a rubber grommet where plumbing passes through. This is a five-minute fix that stops wicking at the exact spot most repeat leaks start.
- Set a waterproof mat under the sink and add a battery-powered leak detector near the P-trap.
- Replace supply lines every 5 to 7 years, before the rubber inside them cracks.
- Do a visual check monthly, and skip storing cardboard boxes or paper goods directly on the cabinet floor.
When Should You Call A Plumber Or Cabinet Pro?
Call a plumber first if the leak is still active, if it’s coming from a floor penetration, or if you suspect a slab leak. There’s no point repairing wood that’s about to get wet again.
Call a mold remediation company for anything beyond a small, surface-level patch. Call a carpenter or cabinet specialist once the frame itself, not just the floor panel, is compromised.
- DIY overlay or panel patch: mostly material cost, a weekend of labor.
- Professional overlay or panel replacement: typically a few hundred dollars per cabinet, depending on plumbing complexity.
- Full cabinet refinishing: $3,000 to $8,000 for a kitchen’s worth of cabinets.
- Full cabinet replacement: $15,000 to $40,000.
Before a contractor visit, have photos of the damage, the cabinet’s approximate age, and notes on whether the leak has recurred.
Why Professional Refinishing Matters For The Repair Decision
Once the structural repair is done, the cosmetic side is where DIY and professional work part ways. Matching an existing factory finish by hand is genuinely hard. Even careful DIY touch-ups rarely blend seamlessly with the surrounding cabinet finish, which is why visible repairs on kitchen-facing cabinets often look patched even after the wood itself is sound.
- A factory-finish, multi-coat process builds several protective layers rather than one topcoat, which holds up better against future splashes.
- Most refinishing projects run 3 to 5 days, not the weeks a full replacement takes.
- Refinishing suits cosmetic and surface-level damage. Structural panel replacement still needs to happen first if the floor itself failed.
If your repair is more complex than a single panel, Cabinet Refinishing Denver can walk through the specifics with you before you commit to a DIY route.
How Do You Dispose Of Water Damaged Cabinet Material Safely?
Once a panel is out, don’t stack it in the garage “just in case.” Wet or moldy particleboard keeps shedding spores as it dries, and every day it sits inside your house is another day those spores have to spread.
Bag the removed panel in heavy plastic sheeting or contractor bags immediately after removal, sealing it before you carry it through the house. This single step keeps loose fibers and mold spores from settling on countertops, floors, or HVAC returns on the way out.
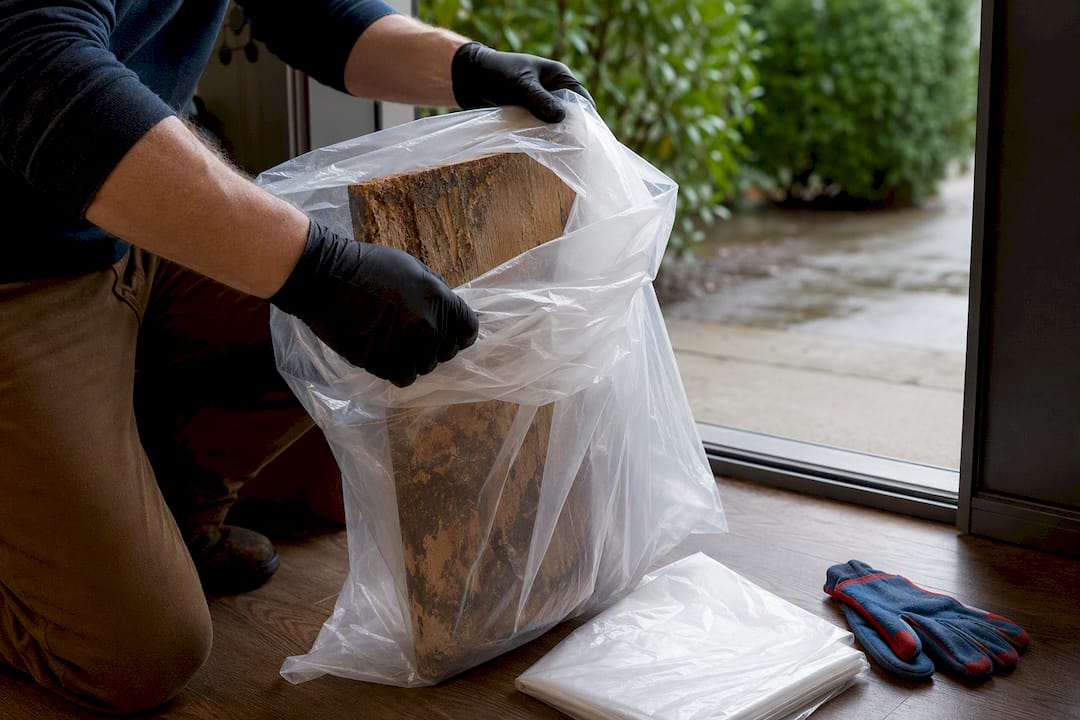
Bring it outside directly, don’t route it through a hallway or living space if you can avoid it. If the panel shows visible mold, double bag it and avoid breaking it into smaller pieces indoors, since cutting or snapping damaged particleboard releases more spores than moving it whole.
Most residential trash services accept water-damaged wood as regular bulk waste, but check your local municipal rules first. Some areas classify moldy building material separately, particularly if the volume is large (a full cabinet box rather than a single floor panel). A quick call to your waste hauler saves a wasted trip if they reject an improperly bagged load.
Wipe down the inside of the cabinet frame and any surrounding surfaces with a damp cloth after removal, even if you didn’t see visible mold on them. Loose debris and dust from the removal process can carry spores that settle nearby. Wash your hands and change clothes if you handled a moldy panel directly, and run a load of laundry separately rather than mixing those clothes with the rest of your wash.
How Do You Catch A Repeat Leak Before It Damages The Cabinet Again?
The repair isn’t finished the day you reinstall the panel. Water damage has a habit of returning through the exact same failure point if you don’t keep watching it.
Do a monthly visual check, thirty seconds with a flashlight under the sink, looking at the base of the supply lines, the P-trap connections, and the perimeter of your new panel. Look specifically for new discoloration, a shift in the caulk line, or dampness on the cabinet floor.
Repeat the paper-towel test every few months, not just once after the repair. Leave a folded paper towel at the lowest point of the cabinet floor overnight and check it in the morning. This catches slow seepage long before it’s visible to the eye or bad enough to smell.
If you installed a battery-powered leak detector, check the battery every six months, ideally alongside your smoke detector check, so it’s not dead the one time it matters. Keep a small log, even a note on your phone, of when you last replaced supply lines. Rubber supply lines degrade over 5 to 7 years regardless of how they look on the outside.
Pay attention to your water bill too. A jump with no clear explanation is often the earliest sign of a slow leak, sometimes weeks before you’d notice anything visually under the sink.
What The Repair Data Actually Tells You
Most advice on this topic overcomplicates the decision. The real question is binary: is the panel still rigid, or has it swollen? Everything else, the sanding, the filler, the debate over sealants, is secondary to that one tactile test.
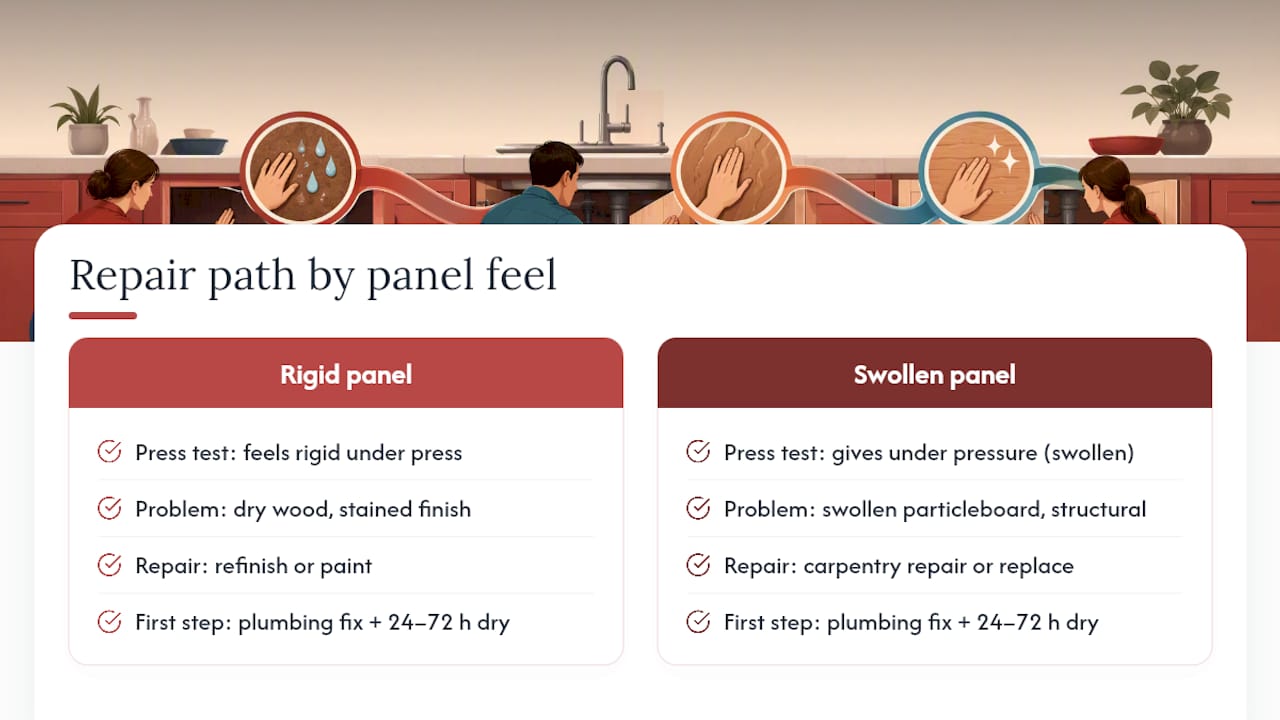
Where conventional advice falls short is treating every water-damaged cabinet as a refinishing project. It isn’t. A cabinet with sound, dry wood and a stained finish is a paint problem. A cabinet with swollen particleboard is a carpentry problem, and no amount of primer changes that. Homeowners who skip the press test and jump straight to painting over a soft floor are the ones calling a contractor again in eighteen months.
What should come first, always, is the plumbing fix and the drying window. Skipping the 24 to 72 hour dry time to “get it done faster” is the single most common mistake I see in DIY writeups, and it’s the one that turns a $40 plywood repair into a mold remediation bill. Professional refinishing has its place, particularly once the structural work is done and you want a finish that actually matches the rest of the kitchen, but it’s a finishing option, not a substitute for getting the carpentry right first.
— Jesse
Need A Second Opinion On Your Cabinet Repair?
If the damage under your sink turns out to be more than a weekend project, or if you’ve patched the floor but the finish still looks rough next to the rest of the kitchen, Cabinet Refinishing Denver handles both the structural side and the cosmetic side without pushing you toward a full cabinet replacement you don’t need.

The team works on minor cabinet repairs alongside their core factory-finish refinishing process, so a water-damaged panel and a tired finish can get addressed in the same visit rather than two separate projects. Most jobs wrap in 3 to 5 days, and refinishing typically runs $3,000 to $8,000 against the $15,000 to $40,000 a full cabinet replacement usually costs. If you’re unsure whether your cabinets need refinishing instead of replacing, an on-site estimate settles it fast. Call or text 720-219-9716, or request a quote online to get a firm timeline and price before you decide.
Sources
- Under-Sink Cabinet Water Damage: What to Dry Out and What to Replace – HouseWise
- REPAIR SINK CABINET WATER DAMAGE + ROT! | The Honest Carpenter
FAQ
How Do You Fix Water Damage Under A Sink Cabinet?
Shut off the water, find and fix the leak source, dry the cabinet for 24 to 72 hours with fans, then either sand and repaint a firm panel or replace a soft, swollen one with sealed plywood.
Can Water Damaged Cabinets Be Repaired?
Yes, in most cases. Surface staining and light swelling respond well to drying and a plywood overlay, though panels that have swollen significantly should be replaced rather than patched.
Will Homeowners Insurance Cover Water Damage To Cabinets?
It depends on the cause: sudden accidental discharge is often covered, while damage from a slow, long-term leak typically isn’t, so check your specific policy and document the damage with photos before repairs.
How Do You Fix Swollen MDF Caused By Water Damage?
You generally can’t. Swollen MDF and particleboard don’t return to their original strength, so the reliable fix is cutting out the damaged section and installing sealed plywood in its place.
Is A Water Damaged Sink Cabinet Always A Full Replacement?
No. Most cases only need the cabinet floor replaced or a cosmetic touch-up. Full cabinet replacement is reserved for cases where the frame itself has rotted or the subfloor is compromised.