
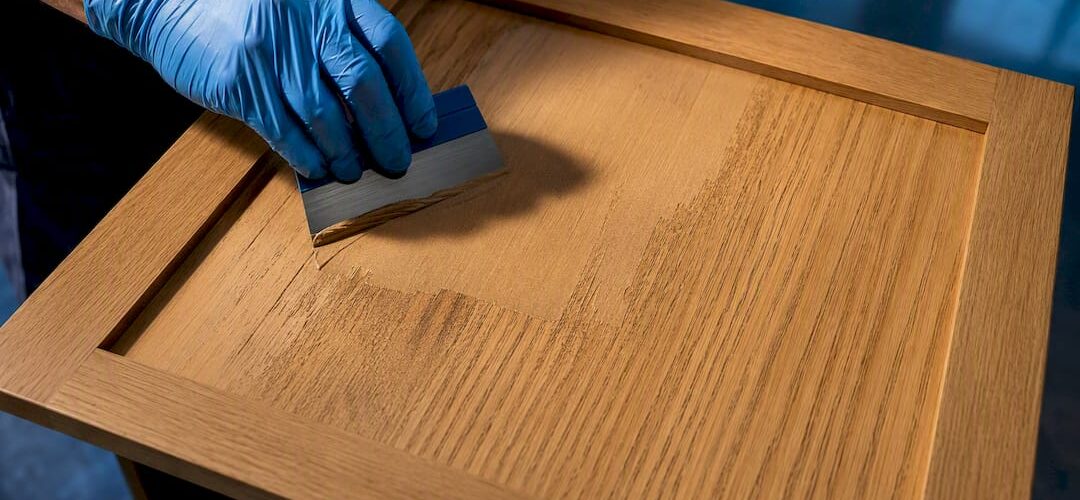
Yes. For a glass-smooth painted finish, oak needs a grain filler because its open pores are too deep for paint and primer alone to hide. The proven route is a water-based cabinet grain filler like Aqua Coat WHITE Cabinet Grain Filler, applied before sanding and priming. The workflow runs in five stages: prep the surface, apply the filler, sand it flat, prime, then paint.
TL;DR:
- Using a water-based grain filler is essential for achieving a smooth, factory-like finish on painted oak cabinets, especially due to its deep pore structure.
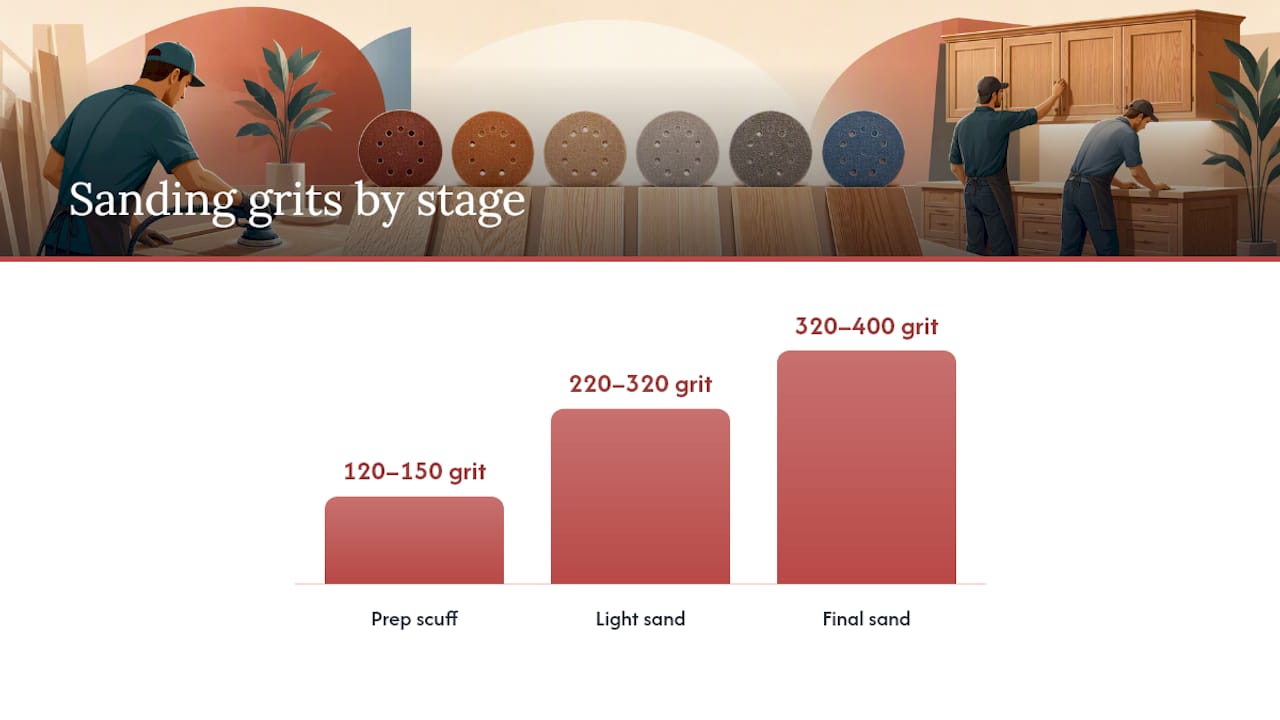
- Proper surface preparation, including degreasing and scuff-sanding to 120–150 grit, is crucial for ensuring good filler adhesion and a flat surface.
- Sanding between coats with progressively finer grits from 220 to 400 ensures the surface remains flat and ready for primer, which must be carefully chosen for oak tannins.
- Most filling errors stem from rushing the process or applying thick coats, which can cause shrinkage, cracking, or tannin bleed, requiring additional touch-up.
- DIY filling is feasible for small projects but usually impractical for entire kitchens due to time, complexity, and risk of defects, making professional refinishing a cost-efficient alternative.
Table of Contents
- Should You Fill Oak Grain Before Painting?
- Materials and Tools You’ll Need
- How to Fill Oak Cabinet Grain, Step by Step
- What Grit and Primer Should Come After Filling?
- Common Grain Filling Mistakes and How to Fix Them
- How Long Does Oak Cabinet Grain Filling Take?
- What Do Professional Refinishers Do Differently on Oak?
- When Does DIY Grain Filling Actually Make Sense?
- Want the Factory Finish Without the Sanding Marathon?
- Sources
Should You Fill Oak Grain Before Painting?
Oak has some of the most pronounced pore structure of any cabinet wood. Even three or four coats of paint will settle into those grooves and telegraph the wood grain right through the finish, which is why “just paint over it” almost never works on oak the way it does on maple or MDF.
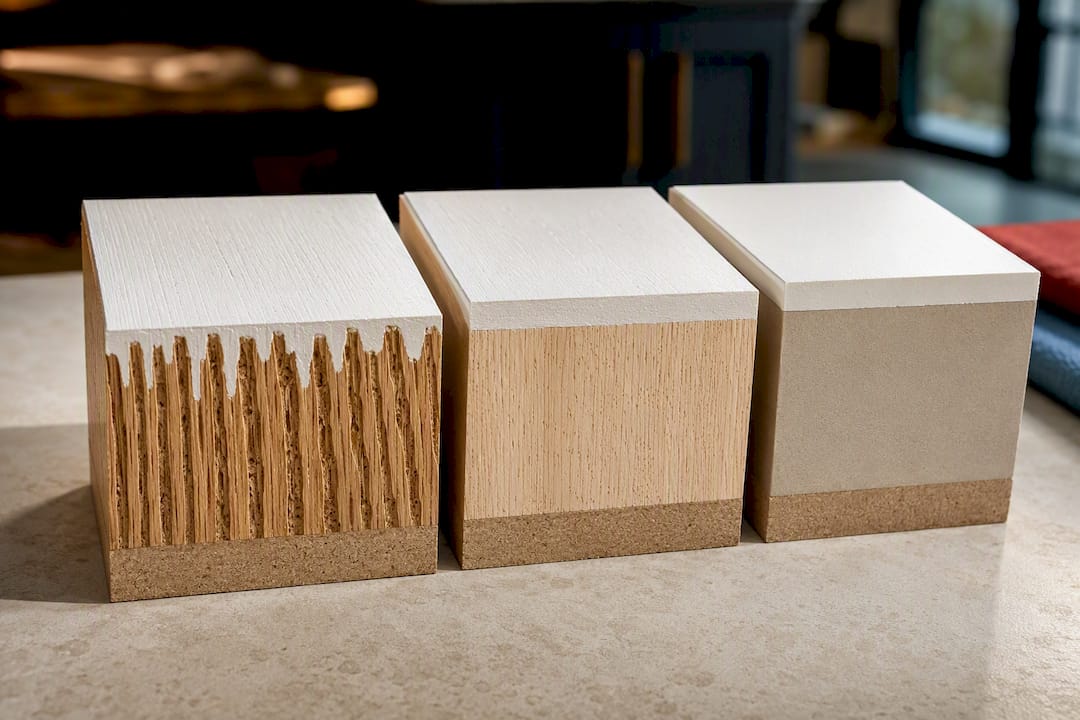
Water-based cabinet grain fillers solve this because they’re built for exactly this job. They sand down easily once cured, dry fast enough to keep a weekend project moving, and clean up with soap and water instead of solvent. That last point matters more than it sounds: no mineral spirits fumes in a garage, no ruined brushes if you forget to clean up before dinner.
That said, filling isn’t automatic for every project. Skip it when:
- You want the natural oak grain to show through a stain or clear coat.
- You’re doing a light refresh with a glaze that’s meant to sit in the grain lines on purpose.
- The cabinets are staying unpainted and you’re just cleaning and resealing them.
If paint is the plan, grain filler is not optional. It’s the step that separates a DIY job that looks “pretty good” from one that looks factory-sprayed.
Materials and Tools You’ll Need
Buy everything before you start. Running out of filler mid-door is a good way to end up with visible seams.
- Grain filler: Aqua Coat WHITE Cabinet Grain Filler uses fine particles suited to oak’s tight pore structure, and the white tint lets you see exactly where you’ve filled and where you’ve missed.
- Application tools: a flexible plastic spreader or squeegee, plus a putty knife for tight corners and profiles.
- Sanding supplies: sanding pads or sandpaper in 220, 320, and 400 grit, plus tack cloths to pull dust off between coats.
- Cleaning agent: a TSP substitute or degreaser to strip kitchen grime before you fill anything.
- Primer: a high-build primer, or a shellac-based sealer if the oak has heavy tannins.
- Optional sprayer: an HVLP unit for a smoother primer and topcoat than a brush can deliver.
- Safety gear: nitrile gloves, a respirator rated for fine dust and, if spraying, solvent vapors, plus real ventilation.
How to Fill Oak Cabinet Grain, Step by Step
Prep is not a formality here, it’s half the job. Pull every hinge, knob, and pull. Degrease with a TSP substitute to strip cooking oil residue, since oil under filler is a guaranteed adhesion failure later. Scuff-sand to 120 to 150 grit to knock down the factory sheen, then vacuum and wipe with a tack cloth so no dust sits between the wood and the filler.
- Load a small amount of Aqua Coat onto your spreader and work it into the surface using a cross-hatch motion, going diagonally in one direction, then the other, to force filler deep into the pores rather than just skimming across them.
- Scrape off the excess at a low angle, almost flat to the surface, leaving filler in the grain but not sitting on top of it as a film.
- Let the coat dry. Manufacturer guidance puts this at 45 to 60 minutes between coats, though thin coats in a dry room can be ready sooner.
- Sand lightly with 220 to 320 grit to knock down any ridges and check your work under raking light. The white tint makes missed spots obvious.
- Apply a second coat. Filler shrinks slightly as it dries, and a thin second pass rather than one heavy coat is what actually gets the surface flat.
- Final-sand with 320 to 400 grit once the second coat has cured fully.
Pro Tip: On shaker doors, run your spreader along the routed profile edges separately from the flat panel. Filler tends to pool in inside corners, and a dry pass with a folded rag pulls out the excess before it hardens into a visible ridge.
For a deeper walkthrough of surface prep before any filler goes on, see this guide to sanding cabinets for refinishing.
What Grit and Primer Should Come After Filling?
Sanding after grain filling isn’t one pass, it’s a progression. Start coarser to knock down any high ridges left by the spreader, then move finer to level the whole surface into one flat plane.
- Use 220 grit first if you see obvious raised areas or spreader lines.
- Move to 320, then 400 grit for the final leveling pass before primer touches the wood.
- Apply a high-build primer, or a shellac-based sealer first if the oak shows tannin discoloration.
- Lay down one to two primer coats, sanding lightly with 320 to 400 grit between each to keep flattening the surface.
- Spray with an HVLP setup for the most factory-like result; if brushing, use a leveling additive and sand lightly between coats to erase brush marks.
Primer selection matters as much as the filler itself. A thin, poorly chosen primer will re-expose texture that the filler already smoothed out.
Common Grain Filling Mistakes and How to Fix Them
Most oak grain filling problems trace back to rushing a step, not choosing the wrong product.
- Filler shrinks after drying: sand lightly and apply a thin follow-up coat rather than troweling on a thick patch, which just creates a new high spot.
- Grain looks raised after a water-based filler: this is the wood fibers swelling slightly from moisture. Sand with fine grit once fully dry, and recoat if the texture is still visible.
- Yellow or brown blotches bleed through primer: that’s tannin bleed, common on oak. A shellac-based sealer or a dedicated tannin-blocking primer stops it before topcoat.
- Filler cracks on door panels after a few weeks: solid wood moves with humidity, and a fully filled panel can crack along grain lines as the wood expands and contracts. If you’re seeing this on multiple doors, a professional spray finish with flexible primers built for wood movement is the safer long-term fix.
How Long Does Oak Cabinet Grain Filling Take?
Budget more time than you think. Each filler coat needs roughly 30 to 60 minutes to dry before the next pass or sanding, and a full cure before heavy handling usually takes about 24 hours. Grain filling itself adds extra time to a cabinet project compared to skipping it. Keep the room warm and dry rather than blasting a heater at the doors. Thin, even coats dry cleaner and more reliably than thick ones forced along with heat.
What Do Professional Refinishers Do Differently on Oak?
Professional shops treat grain filling as one stage in a longer sequence, not a shortcut to skip. Cabinet Refinishing Denver’s factory-finish approach leans on meticulous prep and multiple protective layers precisely because oak’s grain and tannins punish any step done halfway.
On a full kitchen, a shop can complete a factory-finish transformation in a few days, with typical refinishing costs significantly less than full cabinet replacement.
That speed comes from experience with the exact failure points DIYers hit: shrinkage, tannin bleed, and cracking on moving panels. For a full kitchen or high-end doors, that guarantee and faster turnaround often outweigh the savings of doing it yourself. See how this plays out on modernizing oak cabinets in a real kitchen setting.
When Does DIY Grain Filling Actually Make Sense?
A single door or a small drawer run is a fine DIY project, especially if you’re comfortable sanding patiently and don’t mind a slight learning curve on the first panel. Whole kitchens are a different math problem. Cracking risk, coat-to-coat consistency across a dozen doors, and the sheer time cost of sanding every panel three times push most homeowners toward a pro once the job scales past a few pieces.
— Jesse
Want the Factory Finish Without the Sanding Marathon?
Grain filling one door is satisfying. Grain filling eighteen doors, six drawer fronts, and a pantry cabinet is a different weekend entirely, and it’s where most DIY oak projects stall out halfway through primer. A full kitchen refinishing done with a prep-heavy, multi-coat process like the one described above typically takes 3 to 5 days and can cost significantly less than a full cabinet replacement, which usually runs weeks and is more expensive.

If your oak cabinets need more than a single-door test run, request a cabinet refinishing estimate and get a straight answer on cost and timeline before you buy a single can of filler. You can also see the full refinishing process for Denver kitchens to compare against your own project scope.
Sources
- Aqua Coat White Grain Filler, Pint
- How to Paint Oak Cabinets and Not See the Grain Glass-Smooth Finish