
Yes, cabinet painting generates dust, mostly from sanding, and spraying adds a separate mess in the form of paint mist. The good news is that both are controllable. Professional refinishers cut most of it by finishing doors and drawers off-site, sealing off the work area, and running HEPA extraction. Before you hire anyone, ask exactly where the sanding and spraying will happen.
TL;DR:
- Off-site finishing of doors and drawers significantly reduces dust and overspray in the home, especially when a control setup with HEPA extraction is used.
- Proper containment involves sealing off work areas with plastic sheeting, negative pressure ventilation, and documented procedures, which are essential for lead-safe homes built before 1978.
- DIY refinishing often results in more dust due to lack of sealed containment, vacuum use, and thorough masking, making professional help advisable for full kitchen projects.
- Most professional projects take several days, with daily containment cleaning and a 72-hour exhaust period recommended by the EPA to ensure dust clearance.
- The total cost for refinishing typically ranges from $3,000 to $8,000, which is much less than replacing cabinets, especially when the underlying structures are still sound.
Table of Contents
- Is Cabinet Painting Dusty, and Where Does It Actually Come From?
- How Professionals Actually Keep Dust and Overspray Under Control
- DIY Cabinet Painting Tends to Be Messier Than People Expect
- What to Ask a Contractor Before You Sign Anything
- How Long Does the Dusty Part Actually Last?
- What I’ve Noticed About Dust Claims in This Business
- A Shop-Based Process Means Less Dust in Your Kitchen
- Sources
- FAQ
Is Cabinet Painting Dusty, and Where Does It Actually Come From?
Sanding is the real culprit. Getting factory paint or old varnish ready for a new finish means scuffing every door, drawer front, and face frame with 100 to 150 grit sandpaper, and Benjamin Moore’s own prep guidance treats that stage, plus wiping the dust before priming, as the backbone of a good result. That fine wood and paint powder does not stay put. It drifts on air currents, settles on countertops, and works its way into cabinet interiors, vents, and neighboring rooms if nobody contains it.
Spraying is a different animal entirely. Instead of settling dust, you get overspray, a fine mist of atomized paint that hangs in the air and can drift much farther than sanding debris before it lands.
A few other things kick up particles homeowners rarely anticipate:
- Scraping off old caulk or filler around cabinet frames
- Removing hardware that’s been painted over, which often chips the surrounding finish
- Stripping heavy old varnish, which can throw off more debris than a simple scuff sand
Here’s the detail that changes how careful you need to be: if your home was built before 1978, the paint on those cabinets may contain lead, and disturbing it with an uncontained power sander is a real hazard, not a hypothetical one. The EPA’s lead-safe renovation guidance exists specifically because dry sanding lead paint without containment can spread contaminated dust throughout a house.
How Professionals Actually Keep Dust and Overspray Under Control
The single biggest lever a contractor has is deciding where the work happens. Pulling doors and drawers to finish them in a shop removes the two dustiest, mistiest steps, sanding and spraying, from your living space entirely. Only the fixed cabinet boxes get touched at home, and that’s a much smaller footprint. Our off-site cabinet door spray painting process is built around exactly this logic.
For whatever prep does happen on-site, real containment looks specific, not vague. Expect 6-mil poly sheeting taped at every seam, a zippered access flap instead of an open doorway, and a vacuum or air scrubber running to create negative pressure inside the enclosure. That negative pressure is what keeps dust from leaking into the rest of the house every time someone walks through.
Spray work carries its own rulebook. OSHA’s spray-finishing standard requires enclosed booths with mechanical ventilation built specifically to confine and exhaust paint mist, which is exactly why a shop booth handles overspray far better than a spray gun in an open kitchen.
Pro Tip: Ask any contractor to send photos of an actual containment setup from a recent job, not a stock image. A crew that does this regularly will have real photos on their phone in seconds.
Before signing anything, ask for:
- Photos of a recent containment or booth setup
- The extraction equipment’s HEPA rating, in writing
- A written plan describing where sanding and spraying will physically take place
DIY Cabinet Painting Tends to Be Messier Than People Expect
Most DIY cabinet jobs get dusty in the same three ways. First, all the sanding happens right in the kitchen, often with the same orbital sander used on a deck, with no capture system attached. Second, there’s no shop vac running behind the sander, so dust settles instead of getting pulled away. Third, masking is an afterthought, plastic sheeting taped loosely over countertops instead of sealed at every edge.
That’s not a knock on doing it yourself. A few practical guardrails:
- Small touch-ups are fine solo. Fixing a scratch or re-coating one drawer front rarely justifies hiring out.
- Full kitchen refinishes reward a professional. More surface area means more dust, and a factory-level finish is hard to replicate with a brush.
- Any pre-1978 home changes the math. Lead-safe containment isn’t something to improvise.
The baseline process worth borrowing either way is SVT, sand, vacuum, tack, a sequence This Old House walks through in detail. Skipping the vacuum step is the single most common DIY mistake, because leftover dust gets trapped under the topcoat and ruins the finish. Our guide to sanding cabinets for a DIY refinish covers the grit progression and cleanup order in more depth.
What to Ask a Contractor Before You Sign Anything
A short set of direct questions during the estimate tells you more than any brochure will.
- “Where exactly will the doors and drawers be finished, on-site or in a shop?”
- “What HEPA filtration and negative pressure setup will you use during sanding?”
- “Do you follow EPA lead-safe work practices if the home predates 1978?”
- “What does daily cleanup look like before you leave each day?”
Watch for vague or defensive answers. A contractor who can’t describe their containment plan in specific terms, or has no photos of HEPA equipment or lead-safe procedures on hand, is telling you something. Ask for documentation before the contract, not after the sanding starts.
How Long Does the Dusty Part Actually Last?
Most professional cabinet refinishing jobs run for several days, a timeline manufacturers guide from Lowe’s as typical for proper prep and multiple coats.
- Day 1: Doors and drawers come off, surfaces get cleaned and sanded, containment goes up.
- Days 2 to 3: Priming, more light sanding between coats, and topcoat application begin.
- Days 4 to 5: Final coats cure and hardware gets reinstalled.
Each day should end with HEPA vacuuming and a tack-cloth wipe-down, not just a broom pass. The EPA recommends keeping exhaust ventilation running for up to 72 hours after the dustiest work wraps, which matters more than most homeowners realize. Clear out cabinet contents before day one, and expect the kitchen to be off-limits at meal-prep times during the middle days.
What I’ve Noticed About Dust Claims in This Business
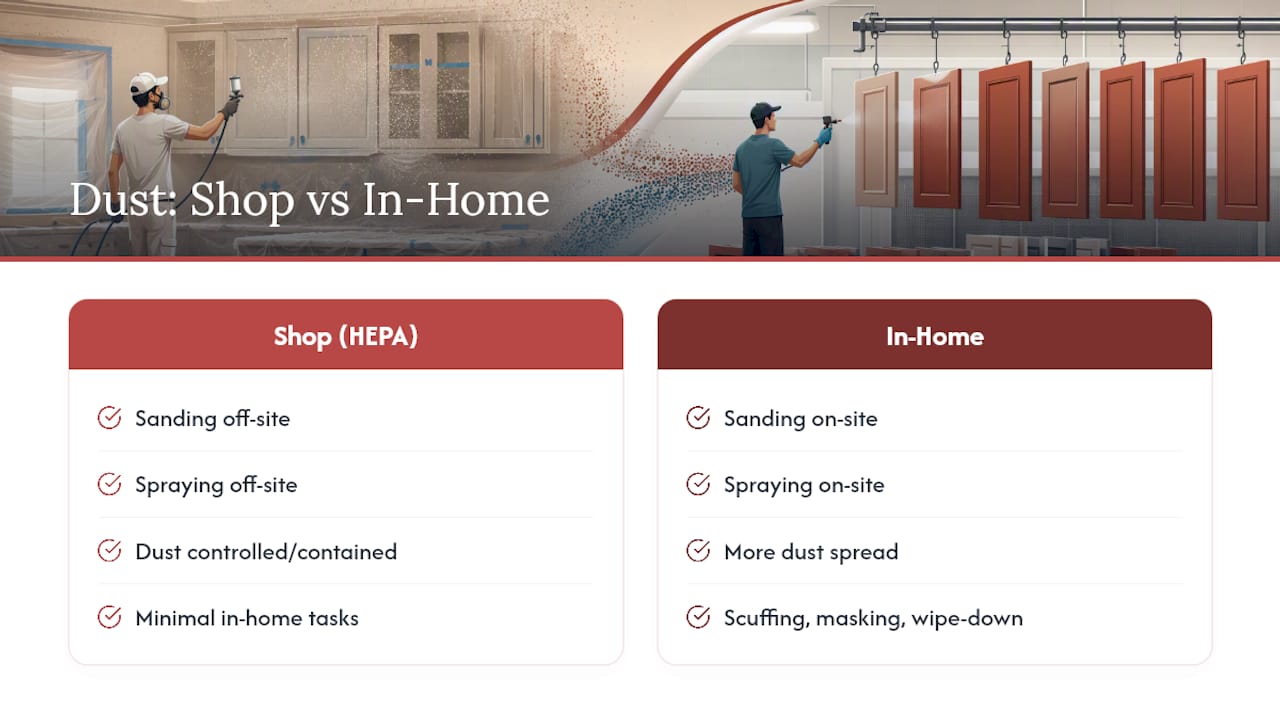
Every refinisher advertises a clean process, but “dust-free” is closer to a slogan than a guarantee. Even shop-based finishing still requires some in-home scuffing, masking, and wipe-down of fixed cabinet boxes, so the honest promise is controlled, contained dust, not zero particles anywhere in the house.
What I do trust is the setup itself. A HEPA-contained shop process, where the sanding and spraying happen away from your kitchen entirely, produces a noticeably smaller mess than any in-home approach, no matter how careful the crew is. That’s the logic behind a factory-finish methodology built around off-site work and a 3 to 5 day turnaround. Whether that approach lines up with your budget depends on your kitchen, but the mechanics of why it’s cleaner hold up.
— Jesse
A Shop-Based Process Means Less Dust in Your Kitchen
A shop-based approach involves finishing doors and drawers off-site in a controlled environment, keeping the heaviest sanding and spraying out of your kitchen, so at home you only manage minimal prep and cleanup, not a full containment project.

If you’re weighing cabinet refinishing against a full replacement, the cost gap alone is worth a conversation, refinishing typically runs $3,000 to $8,000 against $15,000 to $40,000 for new cabinets. Before you hire anyone for a cabinet painting project in the Denver area, ask to see containment photos and confirm lead-safe qualifications if your home predates 1978. Request an estimate and ask those exact questions directly.
Sources
- 1910.107 – Spray finishing using flammable and combustible materials. | Occupational Safety and Health Administration
- How to Paint Kitchen Cabinets Like an Expert in 9 Steps | Benjamin Moore
- Tips for refinishing kitchen cabinets | This Old House
FAQ
Is Cabinet Painting Messy Beyond Just Dust?
Yes, beyond sanding dust, expect paint drips, degreaser residue, and overspray mist if spraying happens on-site. Proper masking and plastic sheeting handle most of it, but a written containment plan from your contractor is the best way to limit mess.
How Do You Avoid Dust When Painting Cabinets?
The most effective method combines off-site finishing for doors and drawers with sealed containment and HEPA extraction for any on-site sanding. Manufacturer guidance from Benjamin Moore also recommends wiping surfaces clean before every coat to prevent trapped particles.
Is Cabinet Refinishing Worth It Compared to Replacing Cabinets?
For most kitchens, refinishing costs $3,000 to $8,000 versus $15,000 to $40,000 for full replacement, according to Cabinetsrefinishing’s pricing. It’s a strong option when the cabinet boxes are structurally sound and you mainly want a new look.
What’s the Best Way to Clean Cabinets Before Painting?
Degrease every surface first, since cooking residue prevents paint from bonding properly, then sand lightly and vacuum before wiping with a tack cloth. Skipping the vacuum step is a common mistake that traps dust under the topcoat, per This Old House’s sand-vac-tack process.
Can You Skip Sanding to Reduce Dust?
Skipping sanding entirely usually backfires, since proper scuffing is what allows paint to adhere long term. A better fix is controlling the dust with vacuum sanders and containment rather than cutting out prep work altogether.