
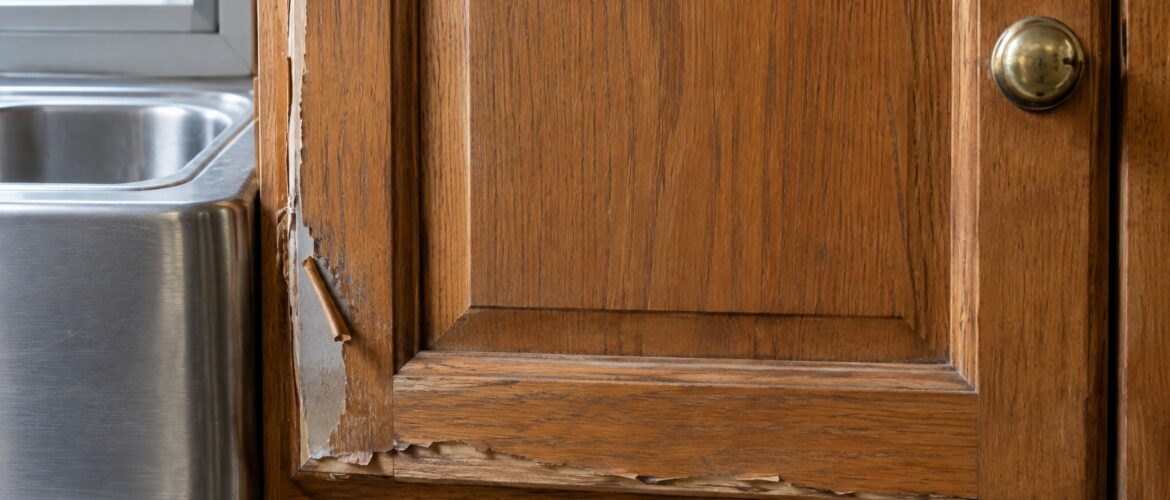
Peeling cabinet finish is one of the most common calls we get, and it nearly always starts the same way. A homeowner notices a lifted edge by the sink, picks at it, and finds a strip of film coming away in one piece. Then they try a can of paint from the home center, and a few months later the edge is lifting again.
We’ve been spraying cabinets in Denver since 1979, so we’ve seen how these failures start and why the quick fixes don’t last. Here is one typical door, what went wrong with it, and what actually fixes it.
Why Cabinet Finish Peels: Poor Prep Plus Denver’s Dry Air
Cabinet paint peels because the finish never bonded properly to what’s underneath it. Poor prep comes first: a surface that was never scuffed, degreased or primed gives the coat nothing to grip, and no amount of Colorado weather is needed to make it let go.
Take a 1990s oak kitchen door with its original factory conversion varnish. The film is lifting at the sink-base door edges and along the bottom rail near the dishwasher. Someone brushed a home-center paint over the trouble spots, and within months that touch-up peeled too. It’s a representative Colorado cabinet paint failure, and the door tells us most of what we need to know.
Reading the failure
Where the film lets go matters. Edges, bottom rails and the areas near water and heat take the most abuse. Steam from a dishwasher, splashes at the sink and radiant heat near a range all attack the bond first.
What comes off with the film tells us which bond failed. If the finish lifts all the way down to bare wood, the bond to the wood failed, usually from moisture, heat or contamination. If the new paint peels cleanly off the original varnish, it never bonded to that varnish at all. The old surface was glossy, greasy from years of cooking, and nobody scuffed it.
You can test this yourself. Cut a small grid of squares through the film with a sharp blade, press strong tape over it and pull it off. If squares come away with the tape, the bond is weak, and that section of the door will keep peeling no matter what goes over it.
Bubbling is a different problem
Cabinet finish bubbling is its own symptom, and it points somewhere else. Blisters mean moisture or heat behind the film, or solvent trapped under a coat that was applied too heavy.
The source has to be fixed first. A blister that’s been sanded and repainted will come back through the new coat, because whatever pushed it up is still there. A leaking dishwasher seal, a hot spot beside the range or a thick brushed coat that skinned over before it dried each need dealing with before any finish goes on.
What Denver’s dry air really does
Denver’s dry air is the stress that finds the weak bond. It is not the root cause. A sound, well-prepped finish usually rides out our climate without trouble.
The trouble is the swing. Heating-season air drops indoor humidity very low, then monsoon spells push it back up. Solid wood shrinks and swells across the grain with that cycle, so a rigid film that was poorly bonded to begin with cracks and lifts at the joints and edges first, because that’s where the movement is greatest. Our oak door shows exactly that pattern: the stile-and-rail joints and the bottom edge went before the flat center panel did.
A new finish can’t stop a leak or undo a swollen, rotted door, though. If water is the cause, that gets repaired before we spray anything.
What a Real Repair Involves, Step by Step
Here is how we take that same door from peeling to finished. Every step exists because the one before it only works if it’s done properly.
- Remove loose film to sound material. We take off everything that’s lifting, back to finish that is firmly attached. Anything left that isn’t bonded will lift again under the new coat.
- Scuff and degloss what survives. Scuffing roughens the surface so a coat can grip it, and deglossing dulls the factory sheen that new finish would otherwise slide on.
- Degrease. Cooking oil and cleaner residue build up where you can’t see them, especially near the range and dishwasher, and they stop a primer from bonding. We wash them off completely.
- Repair damaged edges. Chipped, swollen or worn edges get rebuilt and sanded flush, so the new film has square, solid corners instead of a crumbling lip.
- Spray precat primer through HVLP. Precat primer is a primer with its catalyst built in, so it cures hard and grips both bare wood and sound old varnish. HVLP, short for high-volume, low-pressure, is spray equipment that breaks the material into a fine, even mist with no brush marks. This is the bonding layer, and the whole repair rests on it.
- Spray crosslinking urethane lacquer in thin, even coats. Crosslinking means the lacquer’s molecules link together as it cures, which gives a harder, more chemical-resistant film than ordinary paint. Thin coats let solvent escape instead of getting trapped. We then let the finish cure before the doors go back on.
A touch-up skips steps one through five and goes straight to the paint. That’s why it fails, and it’s why a repair that looks identical on day one can behave completely differently by the next spring.
Why a Touch-Up Won’t Fix Peeling Kitchen Cabinets
A brushed or rolled touch-up lands on the same failed bond and the same wood that keeps moving. So it lifts at the same edges, usually within a season or two. It inherits every weakness the first coat had and adds a thicker, stiffer layer on top.
A spot patch has a second problem: it rarely matches sheen across a door. Even when the color is close, a brushed patch and a sprayed original reflect light differently, so the repair stays visible from across the kitchen. If you want the technical gap between the two methods in detail, we’ve laid out spray versus brush on cabinets in a separate comparison.
There is one case where a touch-up is fair. A small chip in otherwise sound finish, with clean edges and no lifting around it, can be dabbed and left alone.
Anything that is lifting, flaking or bubbling is a different job.
Start Your Cabinet Finish Repair Before the Peeling Spreads
Peeling spreads along the edges because every lifted corner lets in more moisture and grease, and the film around it loosens. A door that has one bad edge this fall will often have several by spring, once heating-season dryness has worked on it for a few months.
Waiting also changes the price comparison in the wrong direction. Refinishing typically runs about 70% below a $25,000+ replacement, and the cost logic is laid out in our guide to refinishing or replacing your cabinets. You can also check current refinishing prices before you call. If you’re comparing shops, how to vet a Denver refinisher covers what to ask about warranty and process.
We’re licensed and insured, and we back the work with a 3-year warranty. Most kitchens are done in 2-5 days, so you aren’t living without cabinets for weeks while a problem door gets worse.
If you’re in Denver or anywhere across the metro, contact the shop about your doors. Tell us where the finish is lifting, and we’ll tell you what it needs.
Frequently asked questions
Can I sand and repaint peeling cabinets myself?
You can, but the result only lasts if every loose bit of film is removed, the surface is degreased and a bonding primer goes on first. Most DIY repairs skip those steps and brush paint over them, so the new coat peels at the same edges. If the film is lifting in more than a few spots, a sprayed repair is the more reliable route.
Will Denver’s dry air make a new finish peel again?
Not if the bond is sound. Dry air and seasonal humidity swings move the wood, but a properly scuffed, degreased and primed surface sprayed with a precat primer and crosslinking urethane lacquer holds through that movement. Our work carries a 3-year warranty.
Why are my cabinets bubbling near the stove or dishwasher?
Bubbles mean moisture or heat is getting behind the film, or solvent was trapped in a heavy coat. Steam and radiant heat are the usual suspects in those spots. The source has to be fixed first, or the blisters will return through any new finish.
How much cheaper is refinishing than replacing peeling cabinets?
Refinishing typically costs about 70% less than a $25,000+ replacement job. The work usually takes 2-5 days, compared with the weeks a replacement ties up your kitchen.