
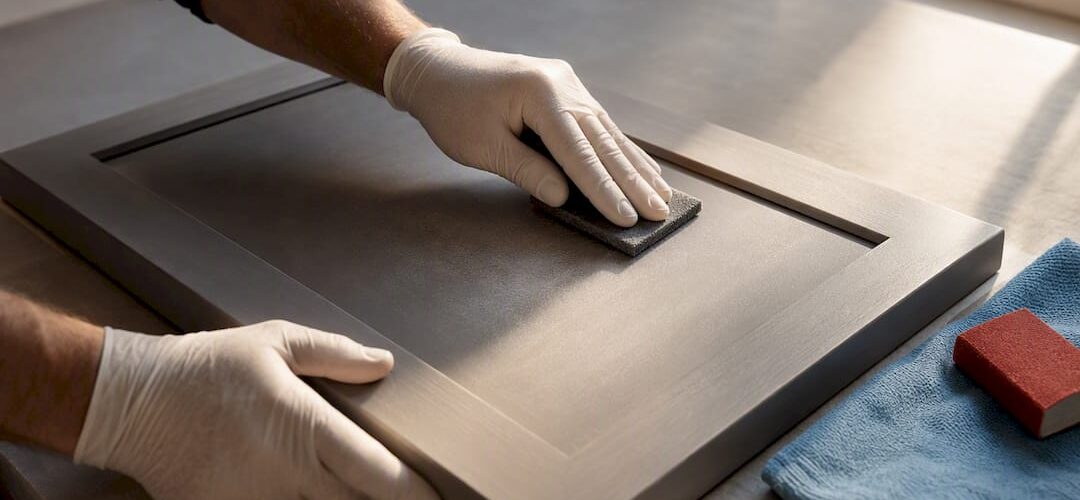
Yes, painted correctly, melamine cabinets can look and perform like refreshed cabinetry for years. The single most important move is treating the surface, not the substrate: clean and degrease, scuff or degloss, apply a bonding primer or a proven no-primer product, then finish with a cabinet-grade paint and let it cure fully. If a cabinet box is water-damaged, delaminated, or the edge banding is failing, painting will not fix it and replacement is the smarter call.
TL;DR:
- Proper prep involves thorough cleaning, deglossing, and surface scuffing with 150 to 220 grit sandpaper to ensure paint adhesion on melamine surfaces.
- Bonding primers like INSL-X STIX or Zinsser Bull’s Eye 1-2-3 are essential, especially on heavily glossy or soiled surfaces, to prevent peeling.
- Two thin coats of cabinet-grade enamel, with light sanding between coats, provide the best durability and finish quality for painted melamine cabinets.
- Full curing of the paint can take up to four weeks, during which doors should not be closed tightly or heavily handled to avoid damage.
- DIY painting is suitable with the right tools and patience, but professional refinishing offers faster turnaround and more consistent, factory-like results.
Table of Contents
- What to buy and why: primers, paints, abrasives and PPE
- How to prepare melamine: inspect, clean, sand or degloss, and repair edges
- Choosing primer and paint that bond to melamine
- Step-by-step application: spraying versus brush-and-roller
- How long to wait, how to cure properly, and simple maintenance tips
- Safety-first spraying and ventilation: EPA best-practices for DIYers
- When to DIY and when to hire pros: pro refinishing as an alternative
- Tips for removing melamine cabinets safely if needed before painting
- Long-term maintenance and care advice to preserve paint durability on melamine surfaces
- Editorial take on DIY melamine painting versus hiring it out
- If you’d rather hire it out: a short note on the client’s refinishing service
- Sources
- FAQ
What to buy and why: primers, paints, abrasives and PPE
Melamine is a slick, resin-coated surface, so every product on your shopping list exists to solve the same problem: getting paint to grip something it was never designed to stick to.
- Cleaning: trisodium phosphate (TSP) or a TSP substitute, microfiber cloths, and mineral spirits for a final degreasing wipe.
- Abrasives: 80 to 120 grit for deglossing stubborn spots, 150 to 220 grit for the final scuff, plus sanding blocks or an orbital sander for larger doors.
- Primer: an adhesion primer such as Zinsser Bulls Eye 1-2-3 or INSL-X STIX, both built to bite into glossy, non-porous surfaces.
- Bonding paint system: INSL-X Cabinet Coat is a common example of a paint marketed to bond directly to laminate-type surfaces.
- Topcoat: a urethane-reinforced or water-based alkyd cabinet enamel, such as Benjamin Moore Advance, in satin or semi-gloss.
- Application tools: an HVLP sprayer or electric handheld sprayer, foam rollers and synthetic brushes for edges, an organic-vapor respirator, chemical-resistant gloves, and drop cloths.
Buying the right primer and paint the first time avoids a second trip to the hardware store after a failed coat.
How to prepare melamine: inspect, clean, sand or degloss, and repair edges
Prep is where most melamine paint jobs succeed or fail. Editorial testing on melamine cabinets found that skipping thorough cleaning and deglossing is the leading cause of peeling, since paint only bonds to whatever layer sits directly beneath it.
- Inspect every door, drawer front, and cabinet box for swelling, delamination, or water stains. Stop and consider replacement if the substrate underneath is compromised.
- Deep-clean grease and grime with a TSP solution, following the label’s glove and ventilation instructions, then rinse and dry completely.
- Scuff-sand the entire surface to remove gloss, not material. Use 150 to 220 grit with light, even pressure so you dull the sheen without cutting into the melamine layer.
- If you prefer not to sand, a liquid deglosser can chemically etch the surface instead. Follow it with a solvent wipe to remove residue before moving on.
- Repair loose or peeling edge banding and fill chips or holes with a wood filler rated for laminate.
- Wipe every surface with a tack cloth immediately before priming to remove dust.
This step-by-step scuff-sanding and deglossing method applies whether you are working on a single vanity or a full kitchen.
Choosing primer and paint that bond to melamine
Most professionals reach for an adhesion primer on melamine because it locks onto the slick surface and cuts the risk of the topcoat peeling later. Trade guidance from Martha Stewart points to bonding primers like INSL-X STIX or Zinsser Bull’s Eye 1-2-3 paired with cabinet-grade enamels such as Benjamin Moore Advance as a reliable combination for laminate and melamine surfaces.
- Some paints, including certain Cabinet Coat formulations, are marketed as needing no separate primer. That claim holds up best on lightly worn melamine that has already been properly deglossed, not on heavily soiled or glossy surfaces.
- Plan on one coat of primer, lightly sanded with 220 grit once dry, before your first topcoat.
- Urethane-reinforced and water-based alkyd enamels resist chipping and yellowing better than standard latex trim paint, which is why they show up repeatedly in cabinet-specific recommendations.
- Dark substrate colors showing through a light topcoat usually mean a second coat is needed, regardless of what the can’s coverage estimate promises.
Pro Tip: Prime one inconspicuous panel first and let it cure overnight. A quick fingernail scratch test tells you whether the bond will hold before you commit an entire kitchen’s worth of doors.
For a deeper comparison of primer options, see this professional primer guide.
Step-by-step application: spraying versus brush-and-roller
Spraying gets you closer to a factory look, but a careful hand-applied job can still hold up well if you keep coats thin and consistent.
- Remove all hardware, number each door and drawer on a hidden edge, and set up a dust-controlled area with drop cloths and cross-ventilation.
- If spraying, hold the gun 8 to 12 inches from the surface, moving in steady, overlapping passes rather than pausing in one spot, which is what causes runs.
- If brushing, cut in edges and profiles with a synthetic brush first, then use a foam roller on flat panels, always keeping a wet edge so lap marks do not show.
- Apply thin coats rather than one heavy one. A thin coat that looks slightly under-covered will look right once the second coat goes on.
- Sand lightly between coats with 220 to 320 grit, wiping away dust before the next pass.
- Watch for orange peel (usually too little thinning or spraying too close), runs (too much material in one pass), and fisheyes (contamination on the surface, often oil or silicone residue that needs a fresh cleaning pass).
Most doors need two coats of primer-adjacent product and two topcoats to fully hide the substrate and build a durable film.
How long to wait, how to cure properly, and simple maintenance tips
Give painted melamine 24 to 48 hours before handling doors carefully, but understand that full cure, when the paint reaches its maximum hardness, can take 2 to 4 weeks depending on the product.
- Keep the room ventilated and at a stable, moderate temperature to help the film cure evenly without rushing it with heat.
- Wait for full cure before rehanging hardware or closing doors tightly, since painted surfaces pressed together too soon can stick, a defect called blocking.
- Once cured, clean with a soft cloth and mild soap and water rather than abrasive pads or strong solvents.
- Avoid hanging heavy items on hooks or slamming doors during the first month while the finish is still hardening.
Safety-first spraying and ventilation: EPA best-practices for DIYers
Spraying paint indoors without the right setup is a health risk, not just a finish-quality issue.
Strong ventilation, air-purifying respirators with organic vapor cartridges, chemical-resistant gloves, and controlling open containers all reduce vapor exposure when mixing and spraying paint.
Work with cross-ventilation or an exhaust fan pulling air out of the space, and wear a properly fitted respirator, not a dust mask, along with gloves and eye protection. HVLP sprayers put more paint on the surface and less into the air compared to conventional sprayers, which cuts both waste and overspray. If you build a makeshift spray area, EPA spray booth guidance notes that well-maintained intake and exhaust filters are critical, since clogged or missing filters let overspray settle back onto your finish. Managing overspray well protects both your lungs and your paint job.
When to DIY and when to hire pros: pro refinishing as an alternative
DIY painting makes sense if you have the space, patience, and either a sprayer or a willingness to accept a hand-applied finish with visible brush texture up close. It gets harder to justify once you factor in equipment costs and the time a full kitchen takes to prep, prime, and coat properly.
If you want a genuinely factory-like finish, a firm turnaround, or a warranty, and you do not already own spray equipment, a shop-based refinisher is the lower-risk route. Cabinet Refinishing Denver states its own factory-finish methodology completes most projects in 3 to 5 days, with the company’s stated cost range of $3,000 to $8,000 compared to $15,000 to $40,000 for full replacement.
Before deciding, weigh your available time, whether you own or want to buy spray equipment, your tolerance for a redo if the first attempt fails, and how long you want the finish to last.
Tips for removing melamine cabinets safely if needed before painting
Sometimes painting in place is not practical, particularly for tight corner cabinets or when you want to paint boxes and doors separately for better coverage. Removing cabinets safely starts with emptying every shelf and drawer completely so nothing shifts or falls during the process.
Locate the mounting screws, usually hidden inside the cabinet along the top rail or through a mounting rail on the back panel, and have a second person support the weight while you unscrew rather than pry. Label each cabinet and its original wall position with masking tape before removal, since melamine boxes often look identical once they are off the wall.
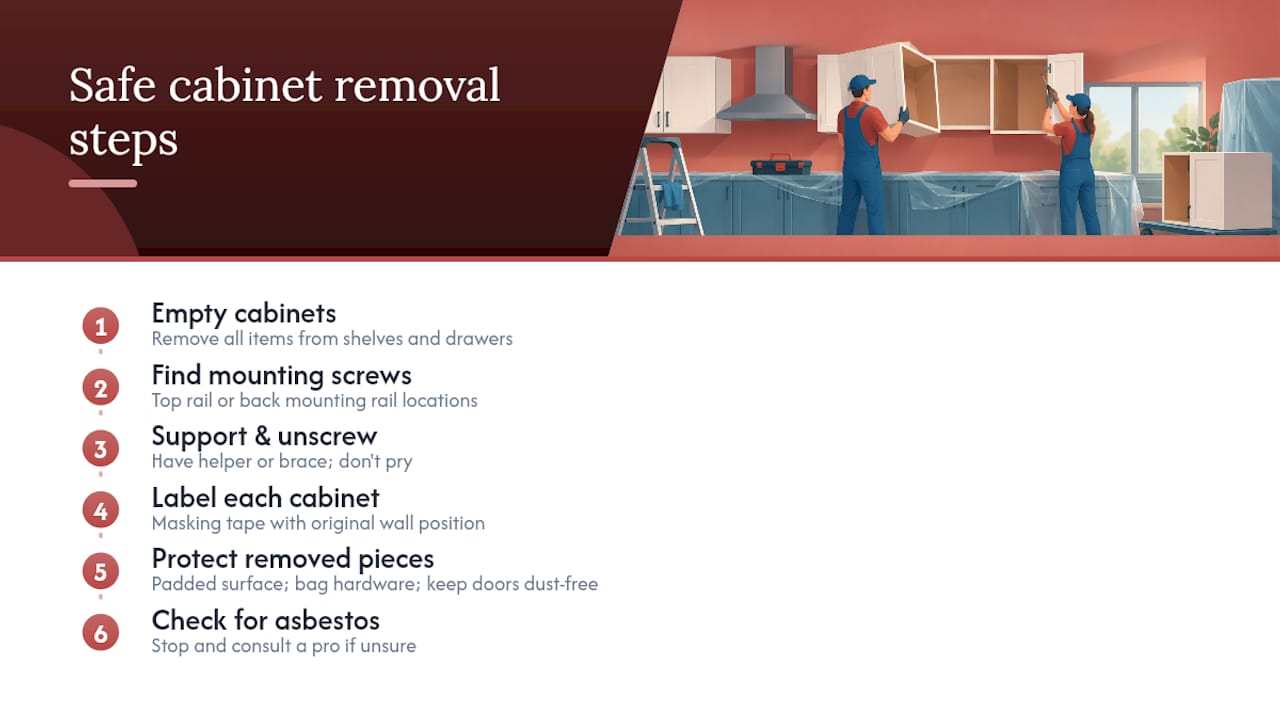
For upper cabinets, use a support brace or have a helper hold the unit steady as the last screw comes out, since an unsupported cabinet can drop suddenly. Set removed doors and boxes on a padded surface, not directly on concrete or tile, to avoid chipping edges that you will then need to repair before priming.
If cabinets are original to an older kitchen, check for any signs of asbestos-containing adhesive behind the units before cutting or sanding near old mastic, and stop work to consult a professional if you are unsure. Once removed, store hardware in labeled bags and keep doors in a dust-free area until you are ready to prep and paint them.
Long-term maintenance and care advice to preserve paint durability on melamine surfaces
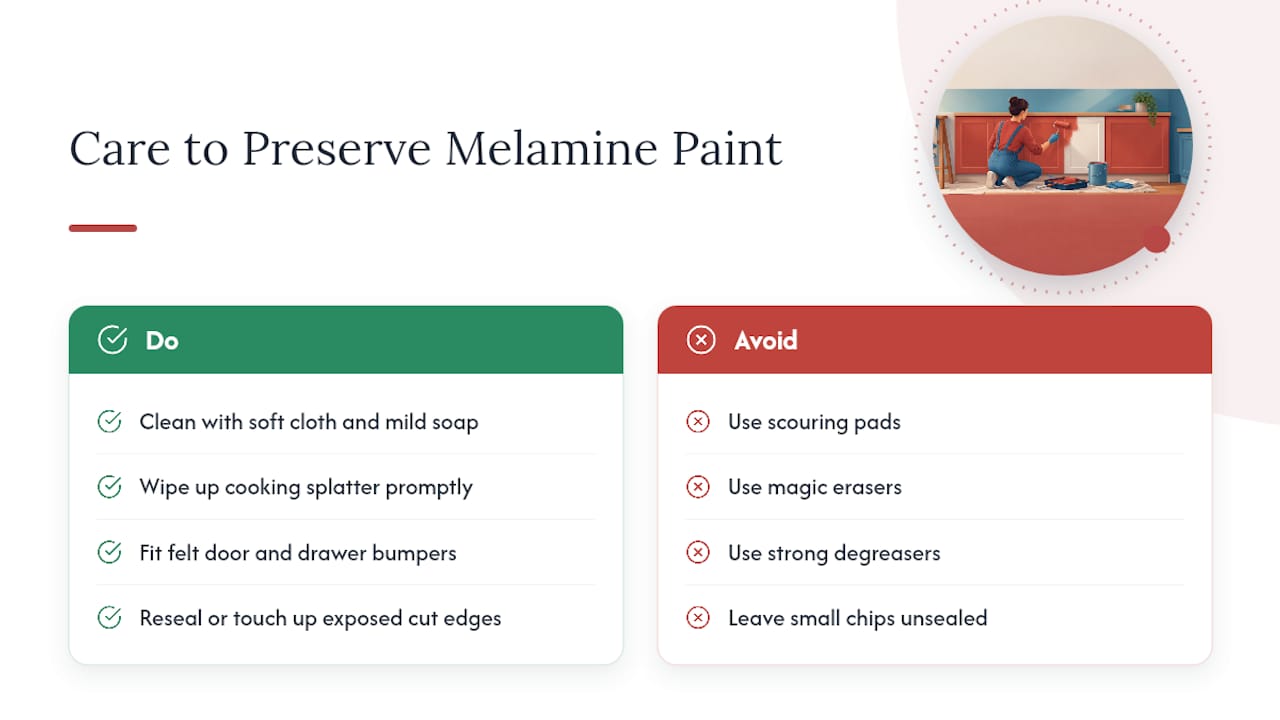
A well-prepped paint job on melamine can last for years, but daily habits determine how long the finish actually holds up. Clean painted cabinet fronts with a soft cloth and a mild dish soap solution, avoiding scouring pads, magic erasers, and strong degreasers that can dull or scratch the topcoat over time.
Wipe up cooking splatter and grease near the stove promptly rather than letting it sit, since baked-on grime is harder to remove without abrasive cleaning that wears down the finish. Felt door and drawer bumpers reduce the impact of daily closing, which helps prevent chipping at corners and edges where paint is most vulnerable.
Keep an eye on exposed cut edges, since melamine’s resin layer is vulnerable at cut edges and seams, and reseal or touch up any spot where moisture could work its way into the substrate. Address small chips with a matching touch-up paint as soon as you notice them, since a small unsealed chip left alone tends to spread as moisture and daily use work at the exposed edge.
Editorial take on DIY melamine painting versus hiring it out
The advice that circulates most about painting melamine treats primer choice as the hard part. It is not. The real determinant of whether a paint job lasts is what happens before primer ever touches the surface: how thoroughly the gloss gets cut and how completely the grease gets removed. A mediocre primer on a perfectly deglossed, degreased door will usually outperform a premium primer on a surface that was wiped down once and called clean.
The second thing conventional advice underplays is cure time. Plenty of guides treat 24 hours as a finish line, when the paint is really only handle-safe at that point, not fully hardened. Rehanging doors and closing them tightly before the finish cures is how good paint jobs develop blocking and early wear.
If you take one thing from this guide, prioritize prep time over product brand. Buy a solid adhesion primer, but spend twice as long sanding and degreasing as you think you need to.
— Jesse
If you’d rather hire it out: a short note on the client’s refinishing service

If the sanding, spraying, and multi-week cure times sound like more than you want to take on, Cabinet Refinishing Denver handles the entire process with a factory-finish methodology, custom color matching, and a stated 3 to 5 day turnaround. Rather than testing primers on a spare door, you get a durable, sprayed finish without the trial runs. Visit Cabinet Refinishing Denver to request a quote or see examples of finished kitchens.
Sources
- US EPA: Best Practices for the Paint Mixing Room
- Spray booth filters: EPA fact sheet
- It May Be Hard But You Can (And Should) Paint Melamine Cabinets — HouseDigest
- How to paint laminate cabinets — Martha Stewart
- Freshen up melamine and laminate surfaces — The Spruce
FAQ
Can melamine cabinets be painted?
Yes, melamine cabinets can be painted successfully as long as the surface is thoroughly cleaned, deglossed, and primed with a bonding primer before topcoating. Editorial guidance on melamine painting points to inadequate prep, not the material itself, as the usual reason paint fails to hold.
What is the best paint to use on melamine cabinets?
Urethane-reinforced and water-based alkyd cabinet enamels, such as Benjamin Moore Advance, are commonly recommended for melamine because they resist chipping better than standard trim paint. Bonding systems like INSL-X Cabinet Coat are also built specifically to grip laminate and melamine surfaces.
Can you paint straight onto melamine?
You should not paint directly onto melamine without prep, since the gloss and grease left on the surface will cause paint to peel. Trade guidance from Martha Stewart recommends scuff-sanding, degreasing with TSP, and applying a bonding primer such as Zinsser Bulls Eye 1-2-3 first.
How do I paint my kitchen cupboards made of melamine?
Clean and degrease every surface, scuff-sand or degloss it, then apply a bonding primer followed by two thin coats of cabinet-grade enamel, sanding lightly between coats. A DIY project like this typically runs from a few hundred dollars up to about $1,200 in materials for a standard kitchen, while professional refinishing costs more but tends to finish faster and hold up longer.