
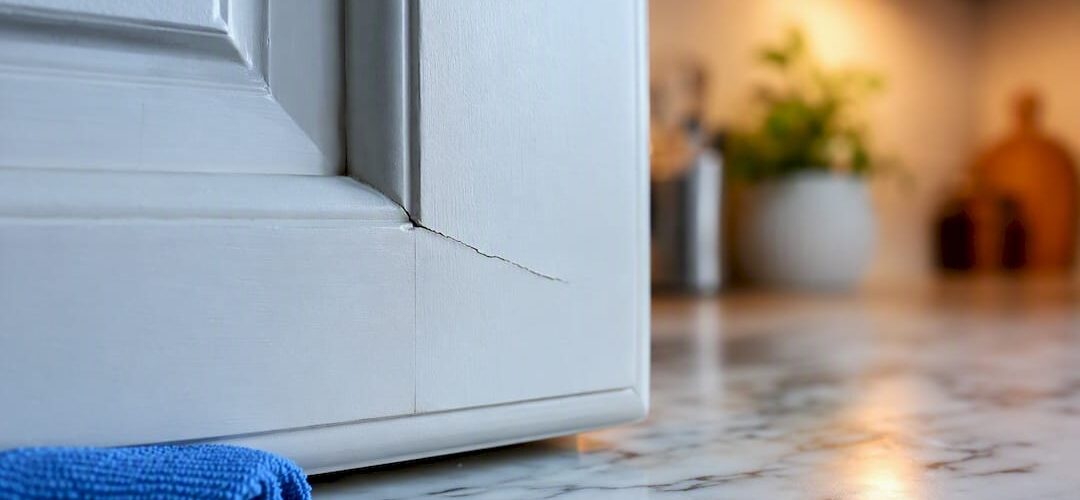
Most cabinet paint cracking comes from wood movement, not bad paint. If the cracks are thin hairlines at the corners and joints, they are likely “witness lines” caused by seasonal humidity swings, and you can usually leave them alone or cover them with paintable caulk. If paint is flaking, lifting, or bare wood is showing, that’s adhesion failure, and it calls for real prep, a bonding primer, and a fresh coat with a protective topcoat.
TL;DR:
- Most cabinet paint cracks result from wood movement due to humidity changes, not the paint quality itself.
- Thin, hairline witness lines can often be fixed with caulk, while flaking or peeling paint requires thorough prep and a high-quality primer.
- Proper refinishing involves meticulous surface preparation, including degreasing, sanding, bonding primer, thin coats, and full curing time.
- Maintaining indoor humidity between 35% and 50% helps prevent wood expansion and contraction that cause cracking.
- Spot repairs are temporary; extensive cracking or peeling demands professional refinishing with controlled application to ensure durability.
Table of Contents
- What Causes Cabinet Paint Cracking?
- How Do You Tell Hairline Cracks From Peeling Paint?
- Can You Fix Cabinet Paint Cracks Yourself?
- What’s the Right Way to Repaint Cracked Cabinets for Good?
- How Do You Stop Cabinet Paint From Cracking Again?
- When Should You Call a Professional Cabinet Refinisher?
- Does Brush or Spray Application Affect Cracking?
- Do Temperature and Sunlight Make Cracking Worse?
- What Painting Mistakes Cause Premature Cracking?
- How Do You Pick Paint and Primer That Resist Cracking?
- How Do You Maintain Painted Cabinets So Cracks Don’t Come Back?
- What This Means for Your Cabinets
- Ready to Stop Patching and Start Fixing It Right?
- Sources
What Causes Cabinet Paint Cracking?
Wood is hygroscopic, meaning it absorbs and releases moisture from the air constantly. In summer humidity, panels swell slightly. In dry winter air, especially once the furnace kicks on, they shrink back. Paint doesn’t flex the same way wood does, so the joints where two pieces meet, or the corners where rails and stiles connect, become the weak points where that tension shows up first.
General Finishes notes that turning up the heat in winter is one of the most common triggers homeowners report. The air dries out fast, the wood contracts, and a crack that wasn’t there in October shows up in January right at the corner of a door panel.
A few other factors make this worse:
- Heavy or stacked paint layers. Multiple thick coats create a rigid shell that can’t move with the wood underneath it.
- Solid wood versus engineered panels. Traditional five-piece doors made from solid wood move more than flat, one-piece MDF panels.
- Wood species and milling quality. Some species shrink and swell more aggressively than others, and poorly dried lumber keeps moving long after installation.
- Rigid, low-flex topcoats. A finish with zero give will crack before a slightly more flexible one does.
Here’s the detail most guides skip: cracking is often seasonal and predictable. Dean Cabinetry points out that witness lines form specifically at joints because that’s where two separate pieces of wood are moving independently of each other. It’s a structural reality of how cabinet doors are built, not a sign that your painter did a bad job.
How Do You Tell Hairline Cracks From Peeling Paint?
Not every crack means the same thing, and figuring out which type you have determines whether you reach for a caulk tube or a sander. Work through this checklist on one affected door before deciding your next move.
- Inspect joints, corners, and panel seams first. These are the highest-stress points and where nearly all cracking starts.
- Run a fingernail lightly across the crack. If nothing lifts, it’s a witness line. If paint flakes off or the crack has raised edges, you’re dealing with adhesion failure.
- Check for bare wood. Exposed substrate along a crack means the paint has separated completely, not just stretched.
- Estimate the affected area. A rule of thumb worth remembering: if cracking or peeling covers more than roughly 20% of a door’s surface, spot repair won’t hold long term, and full refinishing is the better use of your time.
- Photograph everything before you touch it. If you’re planning to file a warranty claim or bring in a contractor, before photos save you a return trip.
Hairline cracks that separate without any loose material are almost always cosmetic. Flaking, bubbling, or curling paint is a different problem entirely, and it usually traces back to poor adhesion during the original paint job.
Can You Fix Cabinet Paint Cracks Yourself?
Thin, non-flaking cracks are fair game for a weekend fix. If nothing is loose and the crack is a hairline at a joint, you can usually handle it in an afternoon without stripping the whole door.
Here’s the sequence that actually holds up:
- Degrease the area with a cleaner made for painted surfaces so the caulk or touch-up has something to grip.
- Scuff or sand lightly with 220 to 320 grit sandpaper to feather the edges of the crack.
- Fill with paintable acrylic caulk for wider hairlines, or use a matched touch-up pen for very fine lines.
- Feather and sand again once the caulk sets, so the repair sits flush instead of raised.
- Spot-coat with matching paint and a light topcoat over the repaired area.
KraftMaid confirms that touch-up pens and fill sticks work well for small, localized defects, but they’re not a substitute for refinishing once damage spreads across a larger area.
If your cracking showed up right after you cranked the heat, consider waiting instead of repairing immediately. Cracks caused by dry air sometimes close back up once indoor humidity returns to normal, and repairing during the driest part of the year can mean redoing the work in spring.
Pro Tip: Run a humidifier in the room during winter months. Keeping indoor humidity closer to 40 to 45% reduces the wood movement that causes new witness lines before they start.
What’s the Right Way to Repaint Cracked Cabinets for Good?
Full refinishing is the only fix that reliably outlasts a season, and it works because it addresses the wood, not just the surface. Skip a step here and you’re likely repeating this project within a year or two.
- Remove doors, drawers, and hardware. Label everything with masking tape and painter’s tape so reassembly doesn’t turn into a puzzle.
- Strip or sand loose paint down to sound edges. Don’t just sand the crack, feather out well beyond it so the new material has a smooth transition.
- Degrease thoroughly. A TSP substitute cleans years of kitchen grease and cooking residue that plain soap and water leaves behind.
- Apply a bonding primer. PaintLikePro recommends a shellac-based or high-bond primer specifically because it seals the substrate and gives the topcoat something stable to grip. Let it dry fully per the product label before moving on.
- Paint in thin, even coats. Cabinet-grade paint applied thick is exactly how you end up back at square one. Sand lightly between coats with fine grit for a smooth build.
- Topcoat with polycrylic or a comparable protective clear coat. This layer is what actually resists daily handling, grease, and cleaning chemicals.
- Let everything cure fully before rehanging. Avoid heavy use for about seven days, even though the paint feels dry to the touch much sooner.
That last step trips up more DIYers than any other part of the process. Procoat Painting reports that skipping proper degreasing and bonding primer is a leading reason cabinet paint peels within six to eighteen months of a repaint. Paint that looks dry after a few hours can still be soft underneath, and rehanging doors too early flexes the finish before it’s had time to fully harden. A step-by-step painting process that respects each dry time between stages is the difference between a repair that lasts and one you’re revisiting by next winter.
How Do You Stop Cabinet Paint From Cracking Again?
Humidity control does more preventive work than any paint product on the shelf. Keeping indoor relative humidity in a consistent range year round, roughly 35 to 50%, reduces the swelling and shrinking that stresses paint at every joint.
A few changes make a real difference over time:
- Run a humidifier in dry winter months and a dehumidifier during humid stretches, especially if your kitchen sits near an exterior wall.
- Choose one-piece MDF doors over solid wood where style allows it. Cutting Edge notes that MDF’s dimensional stability makes it far less prone to joint cracking than traditional five-piece wood construction.
- Confirm wood moisture content before finishing if you’re having new doors built. Wood that wasn’t properly acclimated or dried keeps moving after it’s painted, no matter how good the paint is.
- Keep a labeled can of your exact cabinet paint for future touch-ups instead of guessing at a color match years later.
- Walk through your kitchen once a season and catch new hairlines early, before they turn into peeling.
None of this eliminates wood movement completely. It’s a natural material, and it will always respond to the air around it. The goal is reducing the swing, not stopping it.
When Should You Call a Professional Cabinet Refinisher?
Widespread flaking, multiple affected doors, or any sign of structural movement at the joints are your signal to stop patching and call in a pro. Spot repairs on a handful of hairlines make sense. Spot repairs across ten doors with peeling in multiple spots usually cost more time than a proper refinish.
Professional shops typically use factory-finish, multi-coat spray systems with full prep and controlled curing conditions, an approach that generally holds up longer than brush-and-roll touch-ups done room by room. Cabinetsrefinishing’s own multi-coat finishing process follows this same logic: consistent film thickness across every door, cured under stable conditions rather than whatever the weather happens to be doing that week.
Before hiring anyone, ask these questions:
- What prep steps are included, and does that cover degreasing and sanding to bare substrate where needed?
- Which primer and topcoat brands do you use, and why those specifically?
- How long is the cure time before cabinets go back into daily use?
- Is there a warranty, and what does it actually cover?
- Can I see before and after photos from a similar project?
Pro Tip: Ask a potential contractor how they handle joint cracking specifically. A vague answer is a red flag. A refinisher who understands wood movement will explain how their prep and primer choice account for it.
Does Brush or Spray Application Affect Cracking?
Application method changes how evenly the finish builds, and uneven film thickness is a direct contributor to cracking down the line. Brush application tends to leave thicker paint in corners and thinner coverage on flat faces, exactly the uneven distribution that creates weak points. Those thick pools in corners are more likely to crack first because they can’t flex the way a thin, even coat can.
Spray application, by contrast, lays down a consistent film thickness across the entire surface, corners included. That evenness is part of why professional shops spray rather than brush. It’s not about looking smoother, though it does. It’s about giving the finish a uniform thickness that expands and contracts together instead of cracking at the thick spots first.
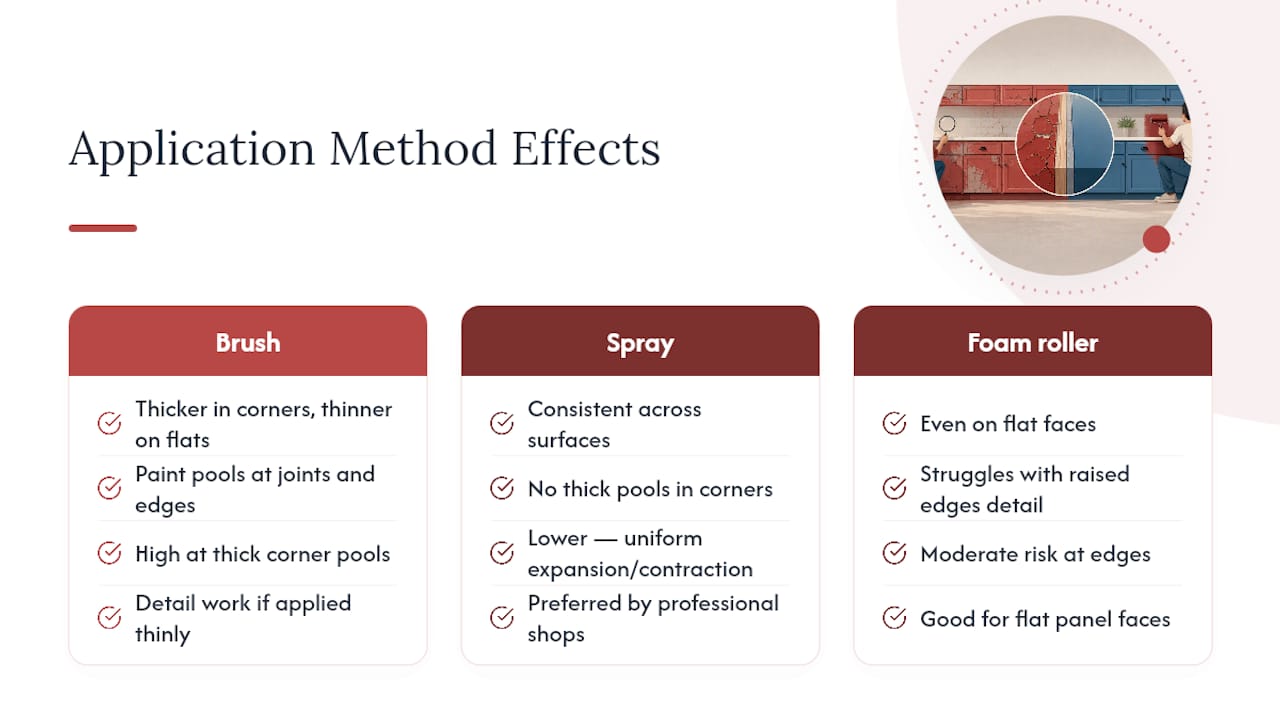
That doesn’t mean brushwork is doomed. A careful DIYer using a quality brush, working in thin passes, and avoiding heavy buildup in corners can get solid results. The mistake most people make is loading the brush too heavily and letting paint pool at joints and edges, the same spots already under the most stress from wood movement. If you’re brushing, tip off corners deliberately with a nearly dry brush to knock down excess buildup before it dries.
Foam rollers split the difference reasonably well for flat panel faces, but they still struggle with the detail work around raised panel edges where brushes or spray guns do better.
Do Temperature and Sunlight Make Cracking Worse?
Temperature swings stress paint the same way humidity does, just through a different mechanism. Paint and wood expand and contract at different rates as temperatures rise and fall, and cabinets near a stove, oven, or a sunny window face constant micro-movement that plain humidity control won’t fully solve.
Direct sunlight adds UV exposure to the mix, which breaks down paint binders over time and makes the finish more brittle and prone to cracking under stress it would otherwise handle fine. Cabinets on a wall that gets afternoon sun through an uncovered window often show cracking and fading years before identical cabinets in a shaded part of the same kitchen.
Cabinets flanking a range are a particularly common trouble spot. Repeated heat cycling from cooking, combined with grease exposure, degrades paint adhesion faster than in any other part of the kitchen. If you’re noticing cracking concentrated near your stove, the heat cycling is likely doing as much damage as any humidity issue elsewhere in the house.
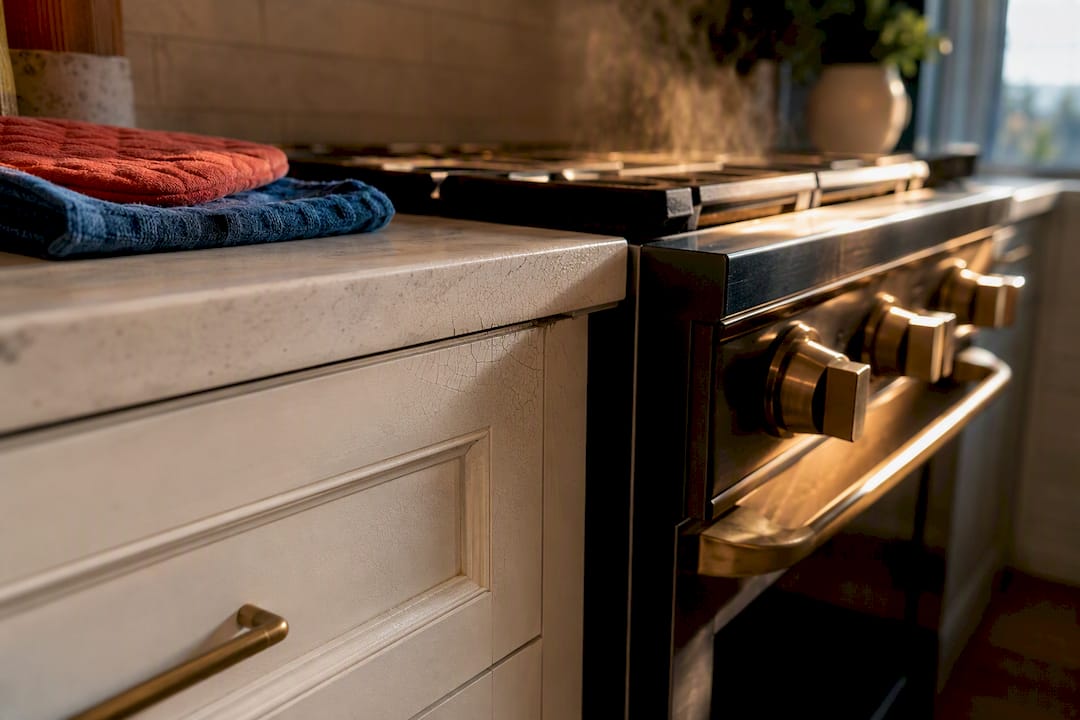
There’s not much you can do about where your stove sits, but you can account for it. A slightly more flexible, heat-tolerant topcoat near cooking surfaces, and closing blinds during the harshest afternoon sun, both reduce the stress those specific cabinets face compared to the rest of your kitchen.
What Painting Mistakes Cause Premature Cracking?
Insufficient drying time between coats is the single most common mistake behind early cracking, and it’s an easy one to make because paint often looks and feels dry long before it actually is. Applying a second coat over a first coat that hasn’t fully cured traps solvents underneath, and as that trapped moisture eventually escapes, it stresses the paint film from below.
Other frequent errors compound the problem:
- Skipping primer entirely, or using a wall primer instead of a bonding primer made for cabinet substrates.
- Painting over glossy existing finish without scuffing it first, which gives the new paint nothing to grip.
- Working in a space that’s too cold or too humid during application, since most cabinet paints have a minimum recommended temperature range for proper curing.
- Rehanging doors and loading them with dishes too soon, which flexes a finish that hasn’t fully hardened.
Each of these mistakes is fixable with patience more than skill. The paint doesn’t care how good your brush technique is if it never got the dry time it needed between coats.
How Do You Pick Paint and Primer That Resist Cracking?
Cabinet-grade paint and a proper bonding primer aren’t optional upgrades. They’re the two products doing the most work to prevent the next round of cracking. General-purpose wall paint is formulated for large, low-stress vertical surfaces, not the constant opening, closing, and handling a cabinet door endures daily.
Look for paint specifically labeled for cabinets, trim, or furniture, since these formulas are built with more flexible resins designed to move with wood rather than fight against it. On the primer side, a shellac-based or high-bond primer creates a stronger mechanical and chemical bond to the substrate than a standard latex primer, which matters most on any surface that previously had a glossy factory finish.
A polycrylic or comparable clear topcoat rated for high-traffic surfaces adds a final layer of protection against the daily wear a cabinet door takes that a wall never does. Skipping this step is one of the most common reasons a repaint looks great for a few months and then starts showing the same cracks and chips as before.
Reading the can matters more than reading reviews. A paint’s own label will tell you its intended surface type, recommended dry time between coats, and minimum application temperature. Following those specifications precisely does more to prevent cracking than any brand choice alone.
How Do You Maintain Painted Cabinets So Cracks Don’t Come Back?
A quarterly walkthrough of your kitchen catches new hairlines while they’re still a five-minute fix instead of a weekend project. Look closely at corners, joints, and any door near heat sources or direct sun, since those are the spots that show trouble first.
Keep a small stash of matched touch-up paint and a tube of paintable caulk on hand year round. Catching a new witness line the week it appears means a quick dab of caulk, not a full repaint six months later once it’s spread and started collecting grease and grime.
Wipe cabinets with a gentle cleaner rather than harsh degreasers on a routine basis, saving the stronger TSP-style cleaners for actual prep work before a repaint. Regular gentle cleaning prevents the buildup of grease and grime that eventually works its way into existing cracks and makes them harder to repair cleanly later.
Seasonal humidity shifts will keep testing your cabinets every year, that’s simply how wood behaves. The homeowners who stay ahead of it are the ones treating maintenance as an ongoing habit rather than a one-time fix after the fact.
What This Means for Your Cabinets
The conventional advice on cabinet cracking treats every crack like an emergency, and that’s where most homeowners waste money. A hairline at a corner joint after you turned up the furnace is not the same problem as flaking paint exposing bare wood across three doors. Treating them the same way, either panicking over a witness line or ignoring real adhesion failure because “it’s just cosmetic,” leads to either wasted repaint jobs or repeated callbacks within a year.
What the evidence actually supports is a simple filter: does anything lift when you scratch it? That single test tells you more than any amount of guessing about paint brands or humidity levels. If nothing lifts, you have a wood movement problem, not a paint problem, and caulk plus patience solves it. If it lifts, you have a prep and adhesion problem, and no amount of touch-up pen is going to fix that permanently.
The piece most DIY guides skip is cure time. Paint that’s dry to the touch in hours can still need a full week before it can handle daily cabinet use without failing at the joints again.
— Jesse
Ready to Stop Patching and Start Fixing It Right?
Spot repairs buy time, but if you’re looking at cracking across multiple doors, peeling near bare wood, or a kitchen’s worth of cabinets that have outlasted their finish, patching isn’t the fix anymore. That’s a job for full refinishing, not another tube of caulk.
Professional cabinet refinishing services use a factory-finish spray process with full prep, bonding primers matched to cabinet substrates, and a cure schedule that protects the investment instead of rushing it back into daily use. Many cabinet refinishing projects complete in a few days, offering cost savings compared to full cabinet replacement.
If your cabinets are showing the kind of widespread cracking or peeling this article describes, get in touch with Cabinetsrefinishing for an honest look at whether refinishing or a smaller repair makes sense for your kitchen.
Sources
- Why are my painted kitchen cabinets cracking in the corners after turning up the heat? — General Finishes
- Why painted cabinets peel & how to fix it — PaintLikePro
- How to touch up painted cabinets — KraftMaid support
- How to Address and Prevent Cracking Paint on Cabinets — Dean Cabinetry